Self-publishing a book – Part 3 – Using a good typesetting system
Posted by Filip Ekberg on 23 Sep 2012
This is the third part of the blog series "Self-publishing a book" if you haven’t already check out Part 1 & Part 2.
Word was acting up, I spent too much time trying to work around it and less time on the content — this was not going to work. I decided to drop Word. But for what and how would it make anything easier when all CreateSpace supplied was a Word template?
Stepping out of the comfort zone
Before I actually dropped Word completely I had gotten a lot of feedback from friends on IRC; Most of them recommended me to check out LaTeX. At this point I really had a very little knowledge about what LaTeX was and how to use it. Wikipedia describes LaTeX like this:
LaTeX is a document markup language and document preparation system for the TeX typesetting program. The term LaTeX refers only to the language in which documents are written, not to the editor used to write those documents. In order to create a document in LaTeX, a .tex file must be created using some form of text editor.
 Being a geek by heart, I immediately got interested in trying this out. It sounded pretty much like I could code my own programming book. Which would be very cool. Comparing it to something else, LaTeX is pretty much like HTML and CSS. This makes it perfect for writing something both where you have and not have a known layout when you start writing.
Since I didn't know anything about LaTeX I needed a crash course and somewhere to get a little bit of inspiration/help. Fortunate for me, I found a LaTeX channel on IRC, #latex on freenode. As mentioned in the Wikipedia quote above, LaTeX is actually just a language used for the typesetting system TeX. This explains why the other place where I got a lot of feedback is called tex.stackexchange.com. Both of these (plus google of course) has been very helpful!
Getting a crash course in LaTeX wouldn't be enough, I still needed my book to conform with the CreateSpace guidelines. I hadn't decided the trim size(page size) of the book yet. I was thinking about going for 7" x 10" but then I created a poll on this blog which later changed my mind. It actually turned out that the size I had in mind was the one you guys wanted the least.
So before I could completely step from Word to LaTeX, I had to know if there was some information about LaTeX + CreateSpace. I googled and stumbled upon a forum post on the very good CreateSpace community forum. This post mentioned a CreateSpace package for LaTeX. Best of all, this was open source and available on github!
Now I knew that I could use LaTeX to create my CreateSpace work, I knew that I wanted to step away from Word but I didn't yet know how to write anything in LaTeX or what tools to use.
LaTeX Crash Course
Since I didn't really know anything about how to write LaTeX markup, I searched for a free tools that could help me; I found a program called TeXnicCenter. However, just downloading and installing TeXnicCenter is not enough, you also need to install the "compiler". According to TeXnicCenter, I could get something called Tex Live for this. Tex Live has binaries for both Windows, Unix and GNU/Linux.
When I had both Tex Live and TeXnicCenter installed, I just had to learn how to write LaTeX code and what kind of "stuff" it produced for me. If you install TeXnicCenter and open it up, this is the first thing you will see:
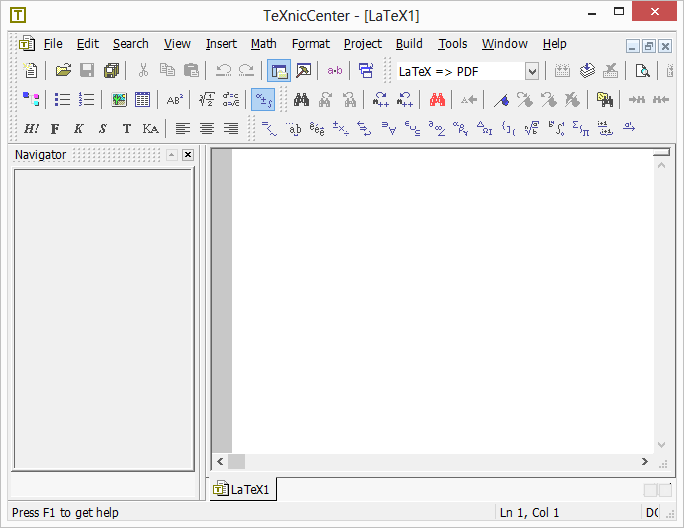
This looks pretty much like any word processor from early 2000.
Just as with HTML, you need to define where your document starts, where it ends and if you have something in the preamble (header section). Here's an example of how to define a document and just have some text in it:
\documentclass{book}
\begin{document}
Hello there!
\end{document}
If we build(compile) and run this, we will see that we got no errors and that 1 page was produced. You run it by clicking the "Build & View current file" button or pressing Ctrl+Shift+F5:
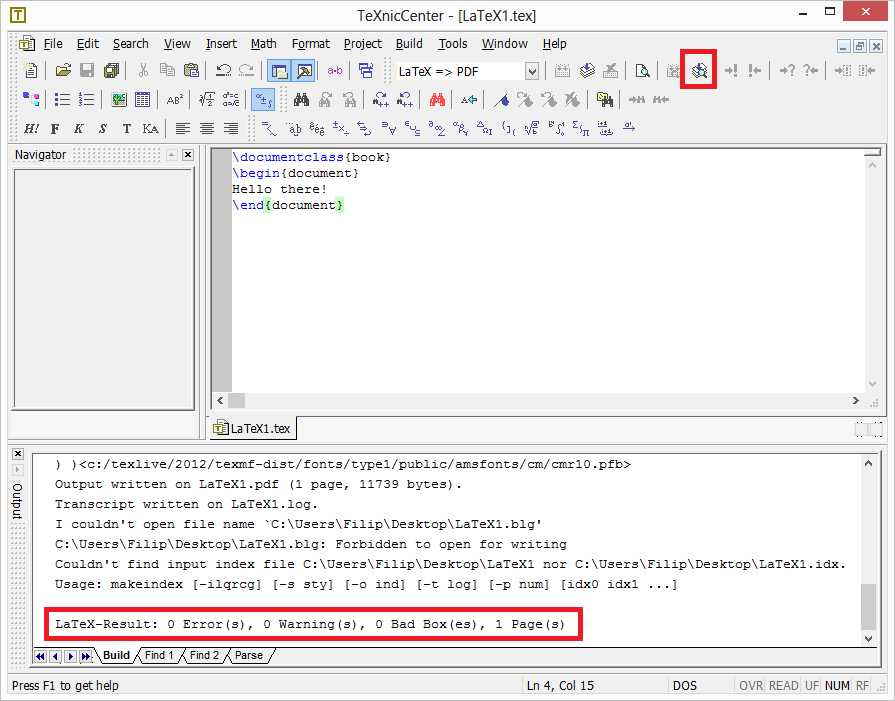
As you might have noticed, it says "LaTeX => PDF" just left of the build icon. This means that when we build the file, we will actually have a PDF created for us! This PDF will be styled as we've said, in this case it will use the default styling of a book.
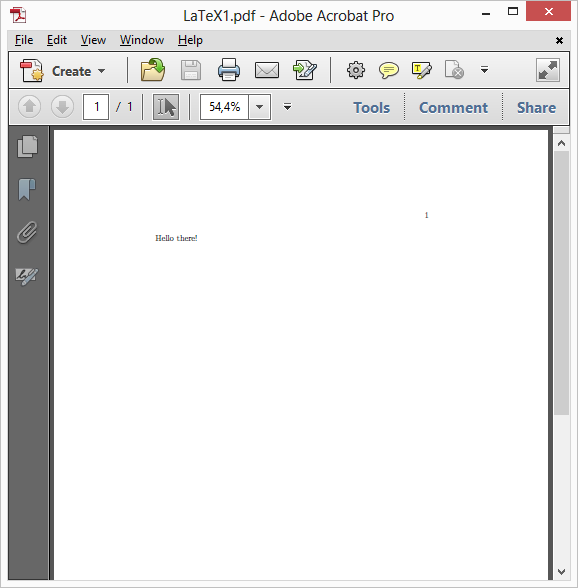
LaTeX allows us to produce much more than just books, we can create articles, papers and much more. This can be decided my changing the document class. In the above example I used the document class book.
This seemed very easy and there was a lot of good information around the net that I could benefit from since TeX wasn't something new. My next concern was the document structure, code samples, chapters, sections and much more. I soon found out that all of these was pretty easy to achieve; at least when using the standard layout it came with.
I decided that I wanted to split my document up into seperate files, 1 file per chapter to keep the master document clean and each chapter as clean as possible. Luckily for me, this was probably the easiest thing to solve.
All I had to do was create a new file, I named each file ChapterX.tex and just included it into the master file like this:
\documentclass{book}
\begin{document}
\input{Chapter1.tex}
\end{document}
When installing TeX Live, I also got a lot of very nice packages that I could include that provided additional functionality. One of the most used packages that I found was listings. This package allowed me to embed code samples into the text with a lot of nice options to it.
The following code sample produced a very nice looking output:
\documentclass{book}
\usepackage{listings}
\usepackage{color}
\lstset{language=C,keywordstyle=\color{blue}}
\begin{document}

\begin{lstlisting}
int x = 10;
if(x % 20){

}
\end{lstlisting}
\end{document}
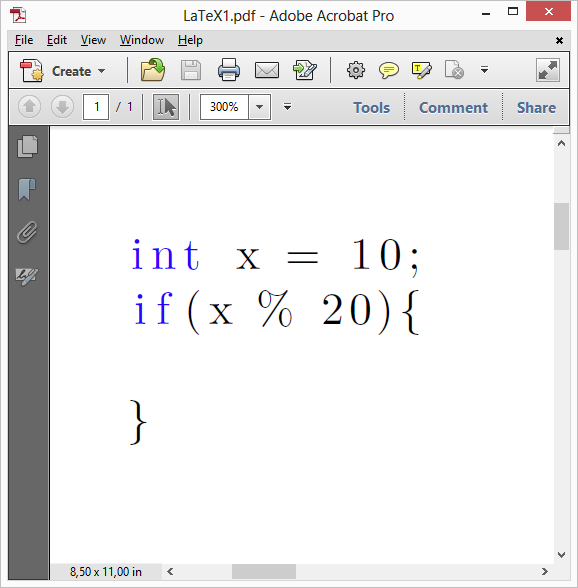
There were of course a lot of things not yet in place, the final design for the book was not done; since there was no content to style yet. Lots of packages and lots of tweaks was waiting along the way.
Actually writing the content
I was very happy with what LaTeX allowed me to do, I felt comfortable with the way that I could change layout as I went on. One of the most important things during the time that I wrote this book was to share early and share often. A good example of this is the initial draft; if I had not shown this until everything was done, the book would not have turned out as good as it did.
Moving to LaTeX was a very good move and I have never regretted it. It took a couple of days to get used to everything but once everything was in place the focus was a lot more on the content than on the buzz around it. It also felt a lot better writing everything from scratch when doing it like this.
I still had a lot of work to do, but I at least had a typesetting system that I was feeling comfortable with and I shared as much screenshots and snippets as possible to make content looking as good as possible. There are a couple of math equations in the first chapter of the book, in the first draft this equation was just plain text; but after sharing almost 15 different versions of the same equation (style wise), it turned out as it did. Again, if I hadn't asked the potential readers and those people that have worked with typesetting before, it would never have turned out as it did!
Now I just needed to write the content. As I wrote Chapter 1, I started to think about how I could ensure quality of the overall book and where to go from now. I knew that I wanted to write high quality content where each sentence had been revised many, many times.
The focus so far had been to find a way to comfortably write the content; I now had to find a way to make the content as good as possible. Possibly with the help of the community, but where do I get such help and how do I organize all the feedback?
Check out the other parts in the series
comments powered by Disqus
 Filip Ekberg is a Principal Consultant at fekberg AB in the country with all the polar bears, Microsoft C# MVP, author of a self-published C# programming book, Pluralsight author and overall in love with programming.
